iStudio Publisher icon

CMYK Colors

Document colors can be specified in CMYK. Here are two main considerations in creating documents in CMYK colors:

Any colors you specify, such as for text, text shadow, stroke, fill, and shape shadow need to be CMYK. CMYK colors can be selected from the standard macOS Color panel, which is integrated with iStudio Publisher.

Images need to be CMYK. iStudio Publisher can't convert colors, and so the source images should be in a CMYK space. If they aren't already, you can convert them using a separate image processing application (ColorSync Utility, Photoshop, or similar).

To choose CMYK colors:
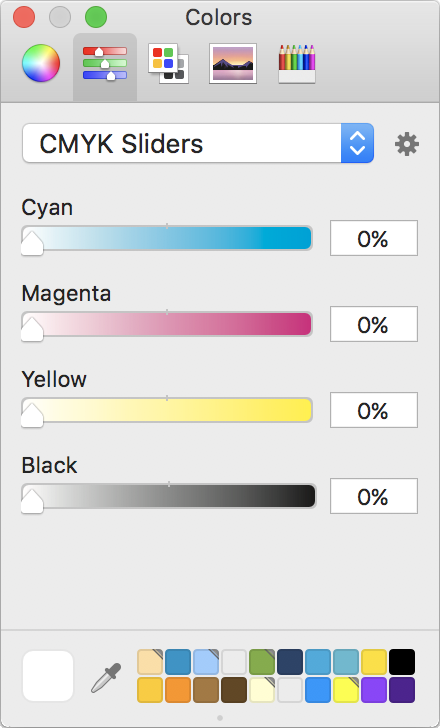
Color panel selecting a CMYK color
Step 1

Select the text or shape whose color you want to change and open the corresponding Inspector.

Step 2

Click an Inspector's color button to open the Color panel.

NOTE: A color can only be chosen from the Color panel when a color button is enabled (denoted by a gray shaded border):

Color button active

as opposed to disabled (white shaded border):

Color button inactive

Click a color button to toggle between disabled/enabled.

Step 3

In the Colors toolbar, choose the sliders (from the choice of color wheel, sliders, palette, image, or crayons).

Step 4

Choose CMYK Sliders from the slider type pop-up list (as shown in the image to the right).

Step 5

Select a CMYK color by adjusting the four sliders. It's important to adjust at least one of the four slider values, even if in doing so you then set it back to its initial value, as this will trigger a CMYK color profile to be selected.

Step 6

Optionally, to check that a CMYK color profile is being used, or to change the color profile, click the gear icon located just to the right of the slider type pop-up list (or in some versions of OS X click the multi-colored square located just to the left of the slider type pop-up list). A list of CMYK color profiles will be displayed, with the Generic CMYK color profile selected by default. The color profiles available will depend on what other software is installed on the computer. Click a different color profile in the list to select it, if required.

TIP: You can make a CMYK color selection that matches any color visible on your screen - simply click the color dropper tool (or the magnifying glass tool in some versions of OS X) on the Color panel, then click the color on your screen to sample it. Screen colors sampled in this way will generate a color with an RGB color profile, even if the color is taken from a displayed CMYK color or CMYK image. This is because screens are RGB devices and it’s a sample of the displayed RGB screen color, rather than a sample of the ‘actual’ color. To convert this to a CMYK color, choose the CMYK sliders, and (this next bit is important!) move one of the four sliders away from and then back to its initial value, which will trigger a CMYK color profile to be selected.

TIP: At the bottom of the Color panel is a swatch table where it's convenient to store swatches of your favorite colors. Swatches become available for use in any application that uses the Color panel. To add a color to the swatch table, drag a swatch from the color square (located just to the left of the color dropper icon) to any empty swatch table cell. Each swatch will include and maintain its existing color profile. Reorder swatch table cells by dragging them. To remove a color from the swatch table, click the top bar of the Color panel to make it the active window (so the close and expand icons are colored red and green), click to select a swatch table cell, and press the Backspace key to delete it.


To convert an image to CMYK:

Step 1

Open the image in the macOS ColorSync Utility (it's located in the Utilites folder, which is itself in the Applications folder).

Step 2

On the bottom of the ColorSync window choose settings Apply Profile, and Output > Generic CMYK Profile, as shown in this example:

Convert image to CMYK - apply Generic CMYK profile

Step 3

Click the Apply button.

Step 4

On the bottom of the ColorSync window choose settings Match to Profile, and Output > Generic CMYK Profile, as shown here:

Convert image to CMYK - match to Generic CMYK profile

Step 5

Click the Apply button.

Step 6

Choose menu option File > Save As, set the new filename (and folder location, if required), and click the Save button to finish.

Related Topics

About Color Management

Choosing Colors

The Inspectors

Modify image colors in ColorSync Utility